Pages

Showing posts with label cute. Show all posts

Saturday, 20 December 2014

ELF Review


Today I am bringing to you a one brand review. This is an E.L.F. review. If you don't know what E.L.F. is, it's a cheap as chips makeup brand. The acronym is eyes, lips, face. They are a super affordable brand and can be purchased online at eyeslipsface.com as well as sites like beautybay and beautyjoint. If you don't like shopping online, like myself, you can also purchase it from Kmart.

I'm just going to start this off by saying that this is a glowing review. So if you can't be bothered reading this whole review, just  know that you can go wrong with E.L.F. Also, if you can't be bothered reading this, I have a video review of these products coming out on Monday so keep a look out for that.

First things first, let's start with the face powders. I have two. I have the Clarifying pressed powder on Ivory and the High Definition powder in Shimmer. 
I used the Clarifying pressed powder when my acne was really bad. It contains salicylic acid so it's really good and covering and treating acne at the same time. I loved this powder. It definitely helped soothe my acne down as well as setting my powder, helping it last all day. The HD powder is also awesome. It didn't set my powder as matte as the Clarifying powder. The shimmer in the powder is great if you take a lot of photos, as it helps blurs 'imperfections' and blemishes. 

Next is the eyebrow kit, undereye setting powder and cream eyeliner. The eyebrow kit is awesome. You would've heard everyone raving about this if you watch a lot of beauty gurus on youtube or read a lot on blogger or wordpress. The hype is real. It's amazing. Mine is in ash and it matches perfectly. The underage setting powder is an almost exact miniature copy of the HD powder except not as pink, and way more shimmer-y in my opinion. I noticed a huge difference in how my concealer lasted. It didn't feel as tacky, as well as my mascara didn't smudge down under my lower lash line like it used too. It also helps brighten up my underage circles a bit too. The cream eyeliner is the only product I have an issue with. I think this is due to my eye shape. I have hooded eyes, so whenever I applied this it just transferred to the top of my lid. I tried setting it with translucent powder, and I even tried using a black eyeshadow but it still smudged. It also doesn't matter how long I leave it to set, it will still smudge. If any one has any tips on how to get past this, please let me know on here, Facebook or youtube. 

Last but not least, we have the shimmering facial whip in lilac petal, blush in pink passion and the makeup setting spray. The shimmering facial whip is quite good. Not as highlight-y as I would have preferred, but it does the job nicely. It gives a subtle sheen, that's a light pink, champagne colour. I use it on my cheekbones and on my inner corner just to brighten things up a bit. It is also a little bit thick for my liking, but like I said, it does the job. The blush is amazing! I also really want to try their blushes in the other shades that they have too. It's super pigmented and easy to blend out. My favourite out of all these products is the makeup setting spray, which is why I saved it till last. I spray this after my moisturiser, but before I put foundation on and then again when I finish my entire face. This makes my makeup last all day, without a single thing budging. I love it so much that I now feel weird when I forget to put it on before I leave. 

E.L.F. definitely gets a 10/10 from me. Not only is it super cheap, but it's also really good quality. Also, an added bonus is that they don't test on animals. Feel free to recommend any E.L.F products that weren't mentioned above. 

Don't forget to follow me on twitter and instagram, like me on Facebook and subscribe on youtube!
All links are in the about me sections (:

Shannen xx
Photos taken on a Canon 600D
18-55mm lens used

Don't forget to keep an eye out for the upcoming video on Monday (:

Saturday, 15 November 2014

A Day In Photos #1

Today I had a Saturday off, and I don't normally have a weekend day offal I made the most of it. I started the day off with catching up on my tv shows and YouTube subscriptions. Once that was complete,I rang my sister and we made a time to hang out. Before she got to my house, I did a heap of house work. I was super productive and got most of it done. Justine and I hung out for a bit at home. We then went to Feilding for lunch. As you can tell from the photo we decided to pig out a bit and had KFC. After lunch we still had time to kill before she had to go to work so we wondered around the Warehouse for about an hour. I ended up getting a top and she got 2 skirts. We came home again and played with Carwen before Justine had to go. I then worked on my blog, gave it a bit of a redesign. I also filmed a video to go up on Monday. It was quite a productive day in my opinion. 

Let me know how your day was in the comments below! Maybe even do your own day in photos? 

Don't forget to subscribe and follow me on YouTube, Instagram, Twitter and facebook. 

Shannen xx
Photos taken on my phone
Edited on fotor.com

YouTube: https://youtube.com/channel/UCjNKymrFCLKvcEZ4rqupZQw

Instagram: _kaleidoscopecolours

Twitter: _kaleidocolours

Facebook: https://facebook.com/kaleidocoloursx

Saturday, 30 August 2014

Wellington Birthday Haul Part 2!


Part two of my birthday haul happened the day after my birthday. We started the day off early, arriving at the zoo about 10.30am. I'll have more about the zoo next week if you want to know more about our adventure.

Once we were done at the zoo, we went into the city to do some shopping. Our first stop was Kirkaldies and Stains. This department store is amazing for makeup. I bought 2 lip sticks, both from MAC. Both are in the matte formula. The first one I decided to get was Heroine. I love purple lipsticks. The second one I got was Candy Yum Yum. Bright pinks are also a favourite of mine.

After a lot of umming and ahhing I decided to get a MAC foundation too. I was colour matched to NW15 if anyone wants to know. I got the Mineralize foundation.  It does sheer to medium coverage and has a dewy finish. Prices for all the products mentioned will be down below.

After Kirks, we stopped at Starbucks (of course) then moved across the road to Pandora. I got a pink leather bracelet and a silver bow as my first charm. We then walked to Cosmic on Cuba and I purchased Lime Crime Velvetine in Wicked. Such a pretty dark red.

We went back to Kirks on the way back to the car and I stopped at the Mecca Cosmetica counter and picked up two Nars products. I got their blush in Orgasm (so pretty!) and their radiant creamy concealer in vanilla.

The last thing I bought on our Wellington trip part two was a pair of all black converse, which I've wanted for ages. I was originally after the all black leather ones, but they were a bit pricey for what I had left to spend. 

I'll have a swatch and lookbook for Parts one and two coming up on Wednesday so if your curious about how these colours are like on a real life human bean, then watch this space!

Just a disclaimer, yes I bought expensive makeup. I know it's expensive, but it was a once in a lifetime kind of opportunity for me so I took it. If anyone knows somewhere cheaper to purchase it please let me know because I would love to buy it all again. 

MAC Heroine= $40
MAC Candy Yum Yum=$40
MAC Mineral Foundation= $75
Nars blush in Orgasm= $44
Nars radiant creamy concealer in Vanilla= $44
Pandora bracelet and charm= $134
Converse= $69.99 (I had a $30 voucher, so originally $99.99)

To read about the first half of our Wellington adventures, go to http://kaleidocolours.blogspot.co.nz/2014/08/wellington-birthday-haul-part-1.html

Shannen xx
All photos taken in a Canon 600D
18-55mm lens used
Photos edited on fotor.com

Wednesday, 27 August 2014

Wellington Birthday Haul Part 1!


My birthday was recently and the present I got from my beloved was a massive shopping trip. For this massive shop, we went to wellington. The plan was to go to the zoo and then do some shopping then go home, but when we actually got to Wellington, the weather had done a complete 180, going from sunny and warm to rainy and dreadful. So because of this, we just went to Queensgate in Lower Hutt.

This has to be my favourite mall in the lower North Island. Not only is it massive, but Starbucks is only across the road. Starbucks will always be my favourite cafe, always. I wish there was one where I lived.

So aside from spending money at Starbucks, I spent the rest on clothes pretty much. The first thing I bought was actually three pairs of tights. They were on a 3 for $10 special at Equip. I got a plain 80 denier tight, then I got a super thick pair that has a kind of flowery pattern on it and then I got a polka dot pair. After these, I got another pair from Glassons. These were just a basic pair of suspender tights as I needed new ones because my old ones all have holes and ladders in them. I then bought 3 dresses . One from Mirrou (the black one) and 2 from ValleyGirl. The 2 from ValleyGirl are a size 10 and were $15.99 each. The dress from Mirrou was a size large and was on sale for about $20 I think. We went back to Glassons after that and I bought the boots. They are a size 8 (as I'm a 7.5 so I can chop and change between 7s and 8s comfortably.) and were $60. I've had my eye on these boots for months and months so I decided to take the plunge and buy them. While buying the boots, I couldn't help but to grab their buy one get one free nail polishes. I got a bright neon orange and a pretty pastel pink.

There's this one shop in Queensgate that does piercings and sells all sorts of beauty products and stuff which is where I picked up my Beauty Blender dupe. It was $7 and works amazing. I'll do a more in depth review on it as I've only used it a couple of times and not on all of my cream/liquid products.

I think thats all I got in this trip. There will be a part two as we went a few days before my birthday and then the day after as well.

A lookbook and swatch post will be coming up once I've posted Part Two, so look out for that on Saturday!

Shannen xx
All photos taken on a Canon 600D
18-55mm lens used
Photos edited on fotor.com

Wednesday, 20 August 2014

DIY - Coconut Oil Hair Treatment


If you've coloured or bleached your hair as often as me, or if you were given dry, frizzy hair at birth then this post will help you out a lot.

Coconut oil has many uses. It can be used in cooking, hair, skin or makeup. Of course we won't be talking about cooking today. But I will give you a method on how to use it in your hair. Coconut oil makes your hair soft and shiny. This is because it is a heavy oil that actually penetrates into the hair shaft unlike lighter oils like canola or sunflower.

To use it as a hair treatment, you need about 3-5 tablespoons. This will depend on how thick or thin your hair is, or how damaged/dry it is. In the jar, it is a complete solid, so you either need to melt it down into a liquid, or rub it between your hands until it becomes a liquid. In it's liquid state it is easiest to apply to the hair. Personally, I think spooning it into a bowl and then microwaving it is the best for doing this particular hair treatment. I used about 3 heaped spoonfuls and melted it at 20 second intervals, stirring in between until it was melted completely. You don't want the oil to be hot, but it needs to be warm. Once it's melted and your hair is brushed out smooth, spoon it onto your hair, or you could use your fingers, but I found spooning it on easier. Now, you could choose to just the ends or your whole head. As my hair is ruined from years of dying and bleaching, I decided to do my whole head. You need to get all your hair saturated in the oil. Once this is done, tie it up into a bun or stick it up into a shower cap. You can leave it on for 30 minutes or for a few hours. A lot of different tutorials on Pinterest say 30 minutes to an hour before showering and washing your hair, or to leave it on for a few hours to overnight. It all depends on how much time you have. Personally, I think the longer you leave it on the better. The more time it has to penetrate the softer and shinier your hair will be. Either way, you need to rinse it out and wash your hair with shampoo. Again, the tutorials say to rinse your hair at least twice with shampoo to get rid of all the oil. You can condition as usual to make your hair even more softer, but it's not that necessary.

For extra shine, you can add a raw egg.

As an added bonus, to smooth out any frizziness on a non-hair mask day, grab a small pinch of oil and warm it up in your hands then smooth it over your hair. It'll smooth the frizz down and add some extra shine.

If you guys try this, leave me a comment on this post or comment on my facebook and let me know how it goes for you.

Also, if you would like to see a video on how to do the hair treatment to clear anything up, let me know and I'll get onto it as soon as possible.

Shannen xx
Photos taken on a Canon 600D
18-55mm lens used
Photos edited on fotor.com

Wednesday, 13 August 2014

No Heat Waves Trial. Did it work?


After browsing on Pinterest the last couple of days, I've decided to start a series on my blog, similar to Grav3yardGirl's "Does this thing really work?". But instead of as seen on tv products, I'm going to do different no-heat curls methods.

Today I am showing you one of the easiest ones I have come across in my browsing. This is also an alright day style too if you're alright with the milkmaid look. To start off with, you part your hair in two down the middle. Starting on one side, you twist that half away from your face. Once you get to the end of the hair, lift it up over your head, similar to the milk maid braid style. Pin it there with whatever you want, I used bobby pins. Repeat on the other side. I did this when my hair was still damp after having a shower and washing my hair. You could try it with dry hair, but I'm not sure how it will work as doing it on damp hair, it'll set that way. I slept on this for the night.

In the morning, I unpinned it and then brushed it out with my fingers. I didn't give great curls like I expected from the pictures on Pinterest, but it did give nice waves.

Overall, this no heat curls method does work somewhat. I think it would work better on thinner hair rather than on thick hair. Maybe to do it on thick hair, try separating the hair into smaller sections. I did this look the day before I got my hair cut and thinned, so I'm going to try it again tonight with my now thinner hair. I'll post an update on my facebook (https://www.facebook.com/kaleidocoloursx) about how it goes, and also how long the curls stay in with no help from any products.

So yes, this method does work, but it will depend on hair type and thickness.
P.S. I'm going to film videos on how to do the no heat curls methods you guys can see how it's done, instead of reading it. Videos will be uploaded more regularly in a few months as I get more comfortable with editing and sitting in front of a camera talking to no one.

Shannen xx
Photos taken on a Canon 600D
18-55mm lens used
Photos edited on fotor.com

Saturday, 9 August 2014

My new puppy!


Everyone meet mine and Blake's new puppy! Her name is Carwen, which is Welsh. Its another word that means love. She's a rescue pup and is about 7 weeks old. We've been told she is a pitbull cross with a staffy, but we think she is more pitty cross with labrador. She is the sweetest, cutest little trouble maker in the world and I love her so much already.

We've had her for four days already. Her special leg twitching spot is under her chin which reminds me of my cats at dad's. Cwtch (pronounced Cutch, welsh for cuddles) and Carwen get along like a house on fire, both getting over excited when they play together. More times than not Carwen will have started it first, which then gets Cwtch into trouble.

We've started training her already and she's picked up 'sit' really quickly. She also understands the 'stop' command we give Cwtch and will sit and stop when she hears it.

She's already a big part of my family, and will most likely appear in upcoming posts, either as a cute photobomb, or the post will be about her.

She's so sweet.

Sorry for the short post, but I just wanted to introduce you guys to her.
Shannen xx

Photo taken on a Canon 600D
18-55mm lens used

Saturday, 19 July 2014

Nails of the month #2


Normally when I get my nails done, I've been planning it since the last time I saw Sherie, so normally for about a month. This time, I was still trying to figure out how I wanted my nails done as I worked. 

I went straight to Sherie's after work with an idea of what I wanted. I was gonna get three nails in solid black, one in a colour (I hadn't decided yet) and one in solid glitter. 

Now as you can see from the photo, this is not what happened. As Sherie was applying the acrylic I fell in love with the cover pink. Its super sparkly and glittery. I was then debating to leave it at that and just rock around with super sparkly plain nails. But then I had also been thinking of doing this design as it's such a great alternative  to the classic French design. 

I suppose I did still keep to what I had in mind originally with the black, colour and glitter. It just turned out a little different. And of course I ended up choosing pink again. I just love it too much to not have at least one pink nail.

I'm not sure what gel polish she used on the black nail, but I know the pink was an OPI colour. Overall the process took about an hour this time. I don't usually get acrylic, I'm a gel girl. 

Until next time!
Shannen xx
All photos taken on a Canon 600D
18-55mm lens used
Photo edited on fotor.com

Wednesday, 9 July 2014

Imported Candy VS Homeland Candy


Just a warning, none of the food mentioned in this post is healthy whatsoever, except maybe the chocolate drink. That only has 60 calories in it.

Today is a post about my third love. No makeup, no clothes, all food. I love food. Food is my friend. I am always eating. I have more of a taste for savoury food than sweet, but I still have a very big sweet tooth.

I have a strong aversion to all candy native to New Zealand. Pineapple lumps, bleurgh. L&P, yuck. New Zealand marmite is alright, but no way near as good as the UK version, which by the way can't have it's label on display in this country. We went to the Brit shop today and UK marmite has had its label covered, same with Weetabix, the UK equivalent to Weetbix. Which is stupid because the UK has been around for so much more longer than New Zealand, who cares if they have the same name?

Anyways, a short trip to Milson and we come home with some Tea Cakes (equivalent to MallowPuffs for all you kiwi folk), 3 cans of Dr Pepper (although these came from the Pie Factory for only 99c a can!), Fox's Party Rings (childrens biscuts), NikNaks (crisps), a bag of M&S Percy Pigs (BEST CANDY EVER) and one sachet of Options Indulgence hot drink in Chocolate Fudge.

I find myself way more attracted to foods from the UK or America. It has a much better taste than food developed in the land of the long white cloud, imho. It may be more artificial and full of preservatives than the food here, but darn heck does it taste good.

Dr Pepper will be hands down my favourite 'exotic' beverage. Next up would have to be Kool-Aid Jammers in Cherry. These taste so artificial and great. I also like all things Reese's. Reese's Cups, Reese's Pieces.

I will always be willing to pay that extra amount to get candy I actually enjoy, and also because my beloved who is from the UK, gets excited when we find more food he's grown up with. The market in New Zealand is slowly getting bigger, with United Sweets opening up all over the country as well as their online site, along with British food shops.

Also, quick story, Blake and I are currently eating the pack of NikNaks and he grabbed one out of the bag thinking it was just a small one, turns out it was a solid lump of flavouring. These are the Nice 'N' Spicy flavour. He said it hurt.

Shannen xx
All photos taken on a Canon 600D
18-55mm lens used 
Photos edited on fotor.com

Saturday, 28 June 2014

Shoes make me happy. I'm superficial. Whatever


Today, I bring to you my shoe collection! It is definitely much smaller than it was last year as I moved out of home and into a much smaller space. I used to have over 40 something different pairs of shoes, with a much larger heel selection than what I have now.

These days I have 20 pairs of shoes, literally half of what I used to have. I hope to one day have an extensive shoe collection, when me and my beloved have got our own home and he's built me an extravagant walk in wardrobe with a glamorous chandelier in the middle of it all.

So currently, my shoe collection stands at 4 pairs of boots, 2 pairs of ankle boots, 1 pair of creepers, 4 pairs of converse/converse style, 2 pairs of vans/vans style, 5 pairs of flats, and 2 pairs of heels.

All my shoes are listed from the left, and the top row.

All my flats: -Leopard loafers (Rubi, part of a 2 for $30 deal)
                   -Sparkly loafers (Recycle Boutique, $4.50)
                   - Studded loafers (Rubi, $10 (?))
                   - Kitty loafers (Rubi, part of a 2 for $30 deal)
                   - Steve Madden dupes (Kmart, $7)

Converse/Vans: -White Converse (Shoe Connection, $100)
                         - Burgunday Converse dupes (Rubi, $10)
                         - Pink Converse (Recycle Boutique, $35)
                         - Black Converse (Shoe Connection, $100)
                         - Pink sparkly Vans (Shoe Connection, $120)
                         - Hello Kitty Vans dupes (JayJays, $20)

Boots: - Biker boots (JayJays, $20)
           - Studded combat boots (Hannahs, $50)
           - Cherry Doc Martens (TradeMe, $80)
           - Black Doc Martens (Shoe Connection, $250)
           - Floral combat boots (JayJays, $49.99)
           - Taupe ankle boots (Dotti, $30)
           - JC Coltrane dupes (Hannahs, $50)
           - Creepers (Hannahs, $50)

Heels: - Steve Madden Sparkly (Hannahs, ?)
          - Jeffrey Campbell Spiked Litas (Shoe Connection, $250)

All my shoes except one pair, I bought myself. Sadly I don't often get to wear my heels because my Steve Madden heels are exceptionally beautiful and I only reserve them for special occasions. My JC Litas I hardly wear mainly because my sister has them a lot, and they need spikes replaced and the leather fixed up. I would love to wear them more often, but I just never get the chance.

All my other shoes I alternate between them quite regularly. They all get an even amount of wear. I never really spent too much on a piar of shoes except for my JC's and my Doc's. That's only because my Doc's will last me a lifetime and I wanted to treat myself to a pair of really nice shoes.

Shannen xx

All photos taken on a Canon 600D
18-55mm lens used 
Photos edited on fotor.com


Wednesday, 4 June 2014

Daisies are the new black?


From left to right: summer, spring, autumn and winter

Working in retail I pick up on current fashion trends pretty fast, and I don't need to read any magazines to confirm it. I just take a wander around the mall and see what other stores are carrying.

This winter it seems that daisies are taking over. First this trend started with flower crowns. Then it was on all different types of tees. Then as it started getting colder in the southern hemisphere, leggings started sporting this floral pattern. And now that we are fully into winter, it has taken over sweaters and jumpers too. The daisy trend has to be my favourite of the season. I've always been a huge fan of florals, so it was a no-brainer for me.

In my personal wardrobe I have 4 daisy items that I have styled so that this trend can carry on into all four seasons. I have a summer, autumn, winter and spring look that will show how to style this beautiful trend that has popped up.

Please keep in mind that I am only 5ft tall so some of these outfits may look better on taller people, such as the maxi skirt.

Also there will be a lookbook video coming that coincides with this post, I just have to build up the courage to sit behind a camera for a long period of time!

I hope you enjoy todays blog post!
Shannen xx

Summer: Daisy top (JayJays) - Acid wash shorts (Supre) - Converse (Shoe Connection)
Autumn: Knit jumper (Supre) -  Daisy leggings (JayJays)  - Spike combat boots (Hannahs)
Winter:  Daisy sweater (JayJays) - Khaki jeans (JayJays) - Doc Martins (Shoe Connection)
Spring: Daisy crop top (JayJays) - Maxi skirt (Supre) - Ballet flats (Recycle Boutique)

All Jayjays products are either available online (www.jayjays.com.au) or in store

All photos taken on a Canon 600D
18-55mm lens used.
Photos edited on fotor.com

Saturday, 31 May 2014

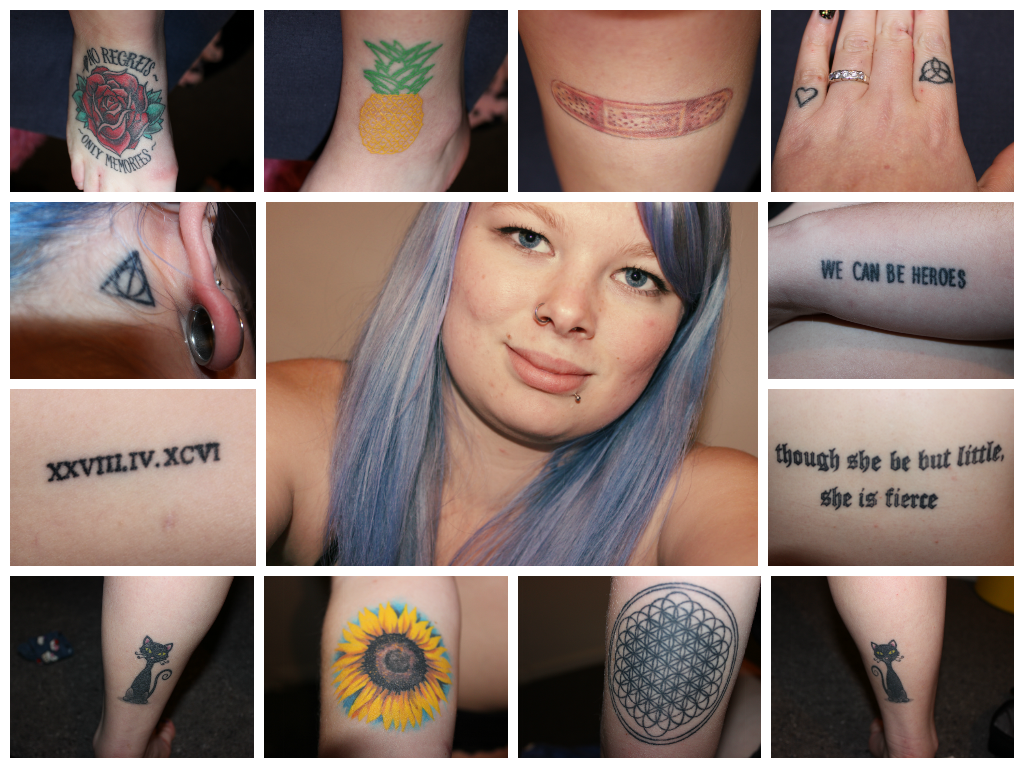
Tattoos: Permanent Fashion Trend


Tattoos are growing ever more popular as time goes on. I myself am a fan of creating beautiful pieces of artwork on  my body. I have a total of 14, and that number is still, slowly, growing. I am a believer in tattoos that don't necessarily have a meaning. If I like the design or the quote, I will get it done. Some of my tattoos have meanings like the Roman numerals on my bicep, they're for my sister. Or my pineapple on my ankle, that's for my beloved. But most of them are just things I like, for example my cats on my calves or my sunflower on my forearm. I love these things and they're nice to look at so I wanted them on my body.

As other trends in fashion, tattoos go through phases with certain styles being more popular than others. Over the last year or so I've seen sugar skulls rise up and then die down as the next popular tattoo idea came in. After sugar skulls there was a phase of the 'white girl' tattoo, that is infinity signs occasionally with words like 'love' and 'family' linked in there somewhere, or dream catchers, or anchors also with words like 'hope' linked into the anchor. Other popular tattoos during this 'white girl' phase were feathers and birds flying off into the horizon. This trend got so popular that it is now being mocked, with a picture of a 'typical girl tattoo form' floating around the internet.

With the growing popularity of tattoos, as well as the steadily growing acceptance of them, more and more people are getting them. These are a permanent fashion trend as they are with us for life. Different styles of tattoos will come and go, but there will always be fans of tattoos. It's a lifelong trend. One I will always love.

Shannen xx

All photos taken on a Canon 600D
18-55mm lensed used
Edited on fotor.com